Kitchens, garages, corridors… fluorescent tubes have been present for many years in electrical installations all over the world. With the arrival of LED technology, the old and inefficient fluorescent tubes are being replaced by the new LED tubes, which offer greater savings and efficiency.

LED tubes offer greater savings and efficiency than the old fluorescent tubes, as well as being an environmentally friendly product.

If you need to renew your electrical installations and you want to know how to change a fluorescent tube for an LED tube, now you can do it with this simple guide that we have prepared in Ledkia, let’s start !
Advantages of replacing fluorescents with LED tubes
The first thing you should know when making the leap to LED technology is the main advantages and characteristics of LED tubes. At first glance it is difficult to differentiate the old tubes from the new ones with LED technology, and since we do not want you to gut your new, brand new LED tube, we will highlight the main internal differences and their advantages:
- Environmentally friendly: the old fluorescent tubes emit light due to the chemical reaction that takes place inside them when the electric current passes through the mercury vapour they contain. This reaction produces ultraviolet light, which is absorbed by the chemical products that cover the interior of the tube, to transform it into visible light. LED tubes do not contain chemical elements inside and therefore are a much more ecological alternative.
- And they last and last and last: LED tubes can last more than 50,000 hours, compared to 10,000 hours for a good fluorescent tube. We are talking about 500% duration, almost nothing!
- No more ballast and starter: the new LED tubes do without these elements necessary for the operation of fluorescent tubes. Besides freeing us from the consumption generated by these two components, it makes the installation of the new tubes as easy as possible.
- Higher efficiency: unlike fluorescent tubes that require an external reflective hood to redirect the light they emit towards the ceiling, LED tubes are directional, emitting light in only one direction, which means a great increase in efficiency. Another point in favour to add to the LED saving account.
- They light up instantly: no more waiting and flickering every time you need to enter the kitchen, the LED tubes do not need to be charged and do not flicker when switched on. They are also unaffected by the number of times you turn them on and off.
Step by step guide for changing fluorescent tubes to LED
Here are the steps you need to take to start saving with the installation of LED tubes.
1. Switch off the electric current.
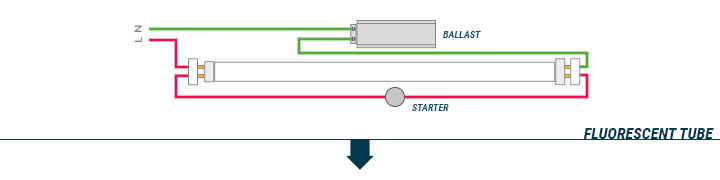
The most important thing to do to start with is to make sure that the current is not connected, which will prevent us from getting any scare. Here you can see the classic configuration of the fluorescent tubes, with the ballast and starter accompanied to the tube and being essential for its operation, with the new LED tubes we can say goodbye forever.
Disconnect the electricity
2. Remove the ballast and the starter.
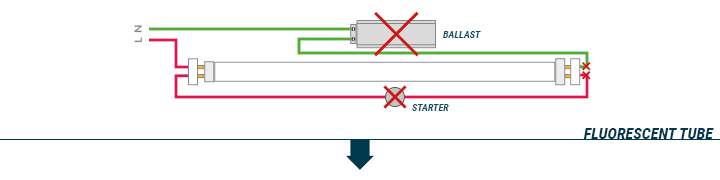
To remove the ballast and starter from the fluorescent tube, simply cut the NEUTRAL wire (blue wire) connected to the ballast and remove it. Repeat the same operation with the PHASE wire (brown, black or grey wire) that connects the starter.
Removing the choke and the ballast
3. Replace the fluorescent lamp with the LED.
Now we will establish a direct connection to our tube, but we must take into account the type of LED tube we have.
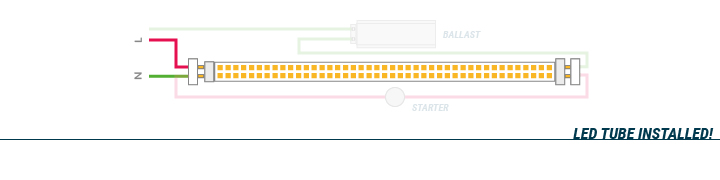
Option A: On the one hand there are the last tubes that have been launched on the market and that have only one side connection, to which we will connect the NEUTRAL cable to one of the metal pins at the end of the tube holder where the driver is placed, and the PHASE cable to the other pin at the same end of the tube. The tubes include an information sticker to locate the correct end of the tube to make the connection.
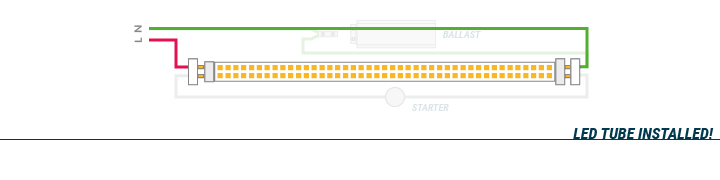
Option B: The other option requires connecting the NEUTRAL cable to the two pins at one end of the tube and the PHASE cable to the other two pins at the other end of the tube.
4. Connect the power and turn on.
Finally, reconnect the power and check that the tube works. You will see that the annoying flickering of lights in the kitchen is over thanks to the fast lighting of the new LED tubes, one of their main features.
We hope that our guide has been of great help to you and that you can enjoy all the advantages that LED lighting tubes offer. Remember that in our online shop Ledkia you will find a wide range of LED tubes to renew the lighting of your home or business.