Planning the lighting in a room can be a headache. On this occasion we will try to show some guidelines that will serve as a guide to answer questions such as: How many light points do I need? How do I have to distribute them? Among others.

Where to start planning the lighting
The first thing to bear in mind is the dimensions of the space, both the square metres and the height of the ceiling, and whether it is a completely open-plan space.
Also, as we have already recommended on several occasions, it is important to know what the room is going to be used for. The activities that take place in the space are key to planning the lighting of a room and deciding on the type of light needed.
It is interesting to take a look at some of our articles on how to illuminate spaces. (bedrooms, shops…) in which we explain the different lighting levels on which we should base our distribution.
How many light points do I need?
The simplest way to estimate how much light is needed to illuminate a room is, if using LED lighting, to use about 4W per square metre. For example, in a 3m x 2.5m room we would need about 30W.
If we decide to use 6W downlights to light the room, 5 units would be sufficient, but it would be advisable to install 6 units for more uniform illumination.
How ceiling height influences lighting
The ceiling height influences two fundamental aspects when choosing and positioning luminaires: the spacing of the lights and the brightness of the luminaires.
The most common spacing between light points is 1m or 1.2m. If we take into account that the ceiling is usually at a height of about 2.40 metres, we can deduce that the spacing between luminaires is approximately half the height of the space.
On the other hand, if the ceilings are higher than usual, we will need some downlights that provide more light.
Separation of lights in relation to the walls
As we have seen, the height of the space influences the spacing of the luminaires from each other. In addition, we will take a spacing of 50 or 60cm with respect to the walls.
Location of light points
Returning to our example room of 7.5 square metres, we have concluded that with 6 x 6W downlights we will have sufficient general lighting.
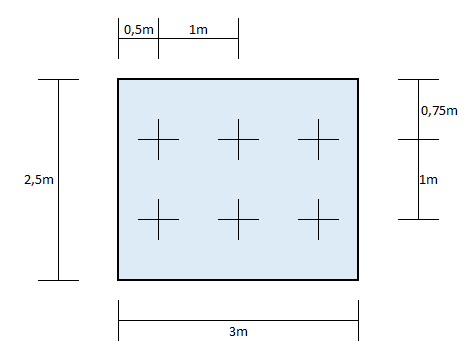
We will always try to ensure that the lighting is as homogeneous as possible. As it is a rectangular room, the easiest way is to arrange the lights equidistantly..
Planning the lighting of a room step by step
Once the basics are clear, it is time to make a step-by-step lighting plan of a more realistic space.The only materials we need is a pencil, a tape measure, a ruler and a sheet of paper, better if it has some kind of grid.
1. Measure the space
The first thing to do is to measure the room and draw it to scale on paper, marking the location of doors, windows, chimney, etc.
One of the most commonly used scales is 1:50, where each real metre is represented by 2cm on the paper.
Then we will draw all the furniture in the room.
2. Decide on the use of each area of space
As we have already mentioned, it is important to foresee the use and activities to be carried out in each room or in certain parts of it.
You can check the recommended light levels in different rooms of a house.
A multifunctional room needs a lighting system that adapts to the different tasks that take place in it.
In a dining room we will have two clearly differentiated areas. In the dining area we will need to focus the light on the table and in the living area a soft ambient light will be sufficient.
If you are also an active reader, it will be very useful to have a reading light.
It is at this stage that we must also decide whether we are interested in highlighting any architectural or decorative elements.
3. Location of luminaires
Now that we know where we are going to need the light, we will draw the light points and mark the “zones of influence” of each one.. To calculate these zones we can use the equations presented in the post on the LED aperture angle.
As a guide, a luminaire with a 120° aperture at a height of 2.40 metres illuminates a diameter of just over 8 metres at ground level. If we use a 90º the covered surface would be reduced to a circumference of 4.8 metres in diameter.
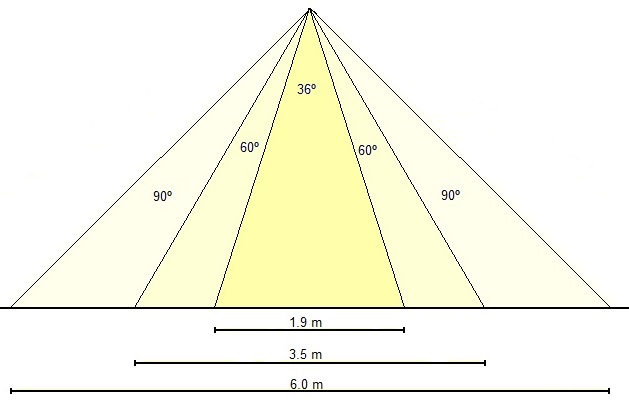
If we wanted the light beams of these luminaires to cross one metre above the ground, we would have to separate the lights by 4.85 and 2.8 metres respectively..
If we are going to carry out a new construction or renovation, the location of switches and sockets must be taken into account.
A luminaire type for every function
There are a multitude of lamps, wall lights, downlights, etc. that we can choose to illuminate a room, the main ones being:
- Wall lights:They are normally used for ambience and as a complement to general lighting.These are wall lamps that do not usually provide a large amount of light, but are essential in the lighting of any space.
- Ceiling lights: They are the basic elements in general lighting. Ceiling lights, surface or downlights with a wide opening angle are generally used so that the light distribution is as uniform as possible.
- Decorative lights: The most typical example of this type of light is the LED strips that we install, for example, in the ceiling moulding. While not essential, they add extra style and personality.
- Working lights: Although work may not be the most accurate name, it allows them to be clearly differentiated from other types of luminaires.These are lamps that are used for specific tasks, such as reading, which have more specific light requirements. Floor or table lamps are the most common.
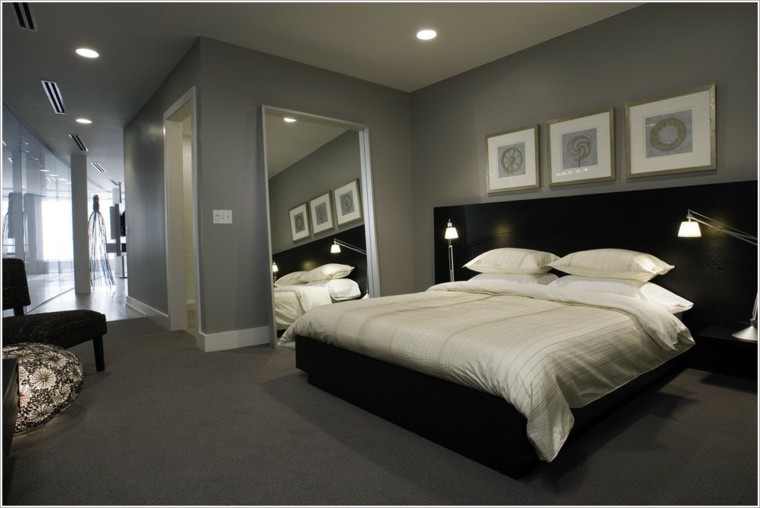
Even so, we can find models that can be adjusted to different roles in our planning. For example, a directional downlight focused on the wall can be a perfect ambient light or a wall light next to the headboard of the bed can be a very practical reading light.
We hope that by following these steps, you will be able to make all your lighting projects a reality. As always, you can leave any questions in the comments.